Near free React hosting on AWS
• • ☕️ 5 min readDo you have a React site, but don’t want to pay for static website hosting? AWS S3 offers a nearly free solution!
To host this blog in March of 2020, it cost me just about $0.52.
AWS Pricing
There are a few different things you have to pay for in order to get a static site hosted on AWS.
S3 - $0.000023
Simple Storage Service provides you with buckets where you can store data. On top of that, it provides a suite of tools to access, serve, and modify your data.
S3 charges $0.023/gb/mo. The average React site should be under a megabyte, so you’ll be paying fractions of a penny for this every month.
Route 53 - $0.50
Route 53 is a DNS management service that interacts very well with AWS tools.
The following Route 53 charges are applicible to this project:
- $0.50 per hosted zone (a domain can be a single hosted zone)
- $0.40 per 1,000,000 requests, up to 1,000,000,000 requests
Since we get under a million requests, we wont be paying for the latter
CloudFront - $0.01
CloudFront is a CDN (content delivery network) with a suite of features that we won’t really be using
CloudFront charges mostly for bandwidth:
- $0.085/gb/mo for up to 10TB of data transfer out
In March, my personal website and blog transfered out 940MB of data costing $0.01
If you want to go with your own DNS, you can get rid of Route53 and cut the total price down to only $0.010023/mo… or a single penny!
Using AWS to host a static website
Run npm build and get your app files ready to go!
Step 1 - Create a S3 bucket
Go into S3 and create a new bucket! You want the bucket to be named the same as the domain where it will be hosted.
For this example, we’ll use test.kalob.net
For Bucket name, enter your domain or subdomain of choice.
For region, this doesn’t matter too much for a static website, but make sure you keep note of what you chose. I am in Indiana, so I’ll use us-east-2
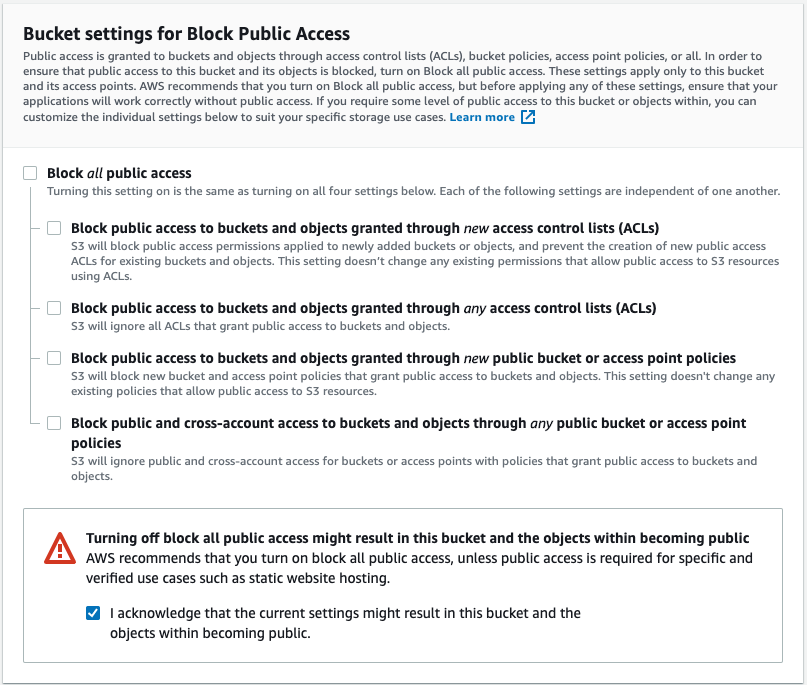
The access settings should look like the following:

Make sure to replace test.kalob.net with your domain
{
    "Version": "2012-10-17",
    "Statement": [
        {
            "Sid": "PublicReadGetObject",
            "Effect": "Allow",
            "Principal": "*",
            "Action": "s3:GetObject",
            "Resource": "arn:aws:s3:::test.kalob.net/*"
        }
    ]
}
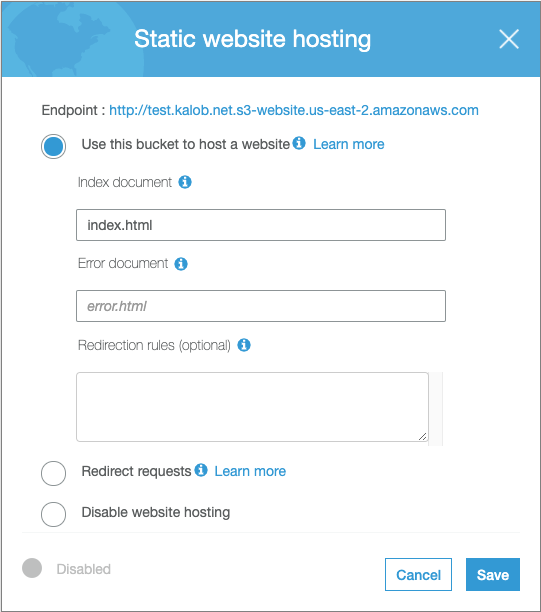
Next, click on Properties, then on Static website hosting.

Copy the endpoint at the top of the section and keep it, we’ll need it later. Mine is http://test.kalob.net.s3-website.us-east-2.amazonaws.com
Step 2 (optional) - Create a certificate
This section is only if you want SSL enabled for your app. It’s free and adds a professional look, so we’ll go ahead and do it in this tutorial.
Open Certificate Manager under Services at the top of the screen.
Look in the top right between your username & support, make sure you are in the same region as your S3 bucket.
Click the bright blue Request a certificate button!
When asked if we want a public or private certificate, public is the option you want to go with.
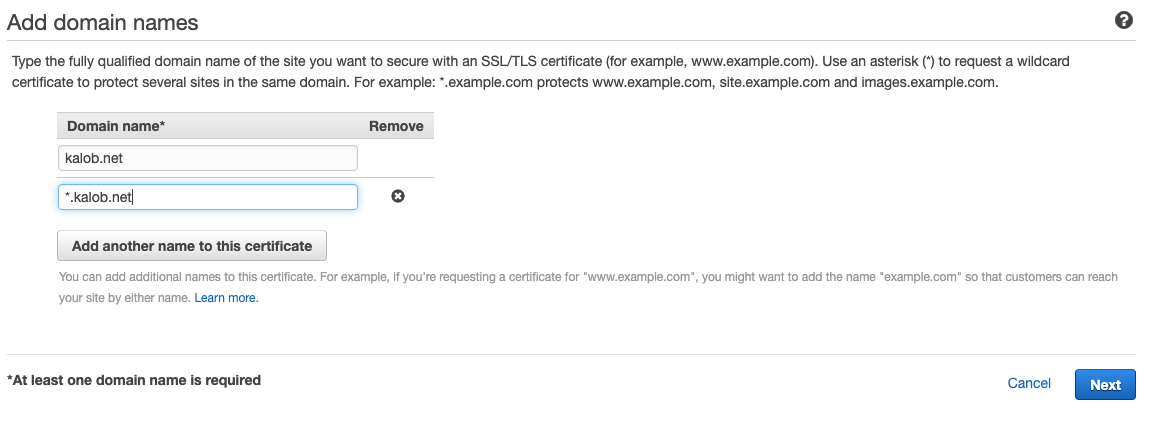
Type in your domain name. If you are using a subdomain, make sure to add *.domain.com to the list. Here is what mine looks like.

Next, follow the steps to vertif your domain.
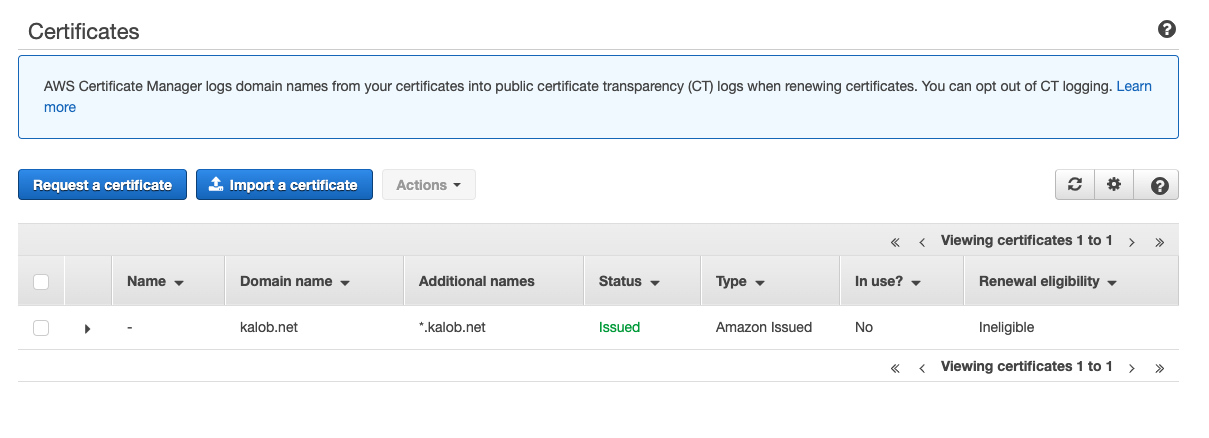
Once your certificate’s status is Issued, you are ready to move to the next step.

Step 3 - Setup CloudFront
Open CloudFront under Services at the top of the screen.
Click the bright blue Create Distribution button.
When given the option of RTMP or Web, choose Web.
For each setting that I don’t mention, the default option will suffice.
Origin Settings
- Origin Domain Name: paste the endpoint we coppied earlier, for me this is
http://test.kalob.net.s3-website.us-east-2.amazonaws.com
Default Cache Behavior Settings
- Viewer Protocol Policy: If you created a SSL certificate, choose
Redirect HTTP to HTTPS
Distribution Settings
- Alternate domain names: Here you want to enter your domain— the same name as your S3 bucket.
test.kalob.netfor me. - SSL Certificate: If you createed a SSL certificate in the previous step, choose
Custom SSL certificateand select the SSL certificate you created. - Default Root Object:
index.html
Create the distribution!
Step 4 - Add route in Route 53, or other DNS
If you are using Route 53, it’s as easy as creating a record, checking “Yes” for alias, and then choosing the CloudFront distribution.
If you are using an external DNS, you need to go back into the CloudFront distribution and copy the Domain Name, then create an CNAME record pointing to that.
Step 5 - Upload your files!
Go back to S3, click on your bucket, and upload your files!
When you drag in the file, click next, then make sure you select “Grant public read access to this object(s)” under “Manage Public Permissions”.
Common Problems
When I go to a route other than the index and refresh, I get a 404 error!
- You’ll want to go into the CloudFront distribution, click on Error Pages, and create a custom error response. You want to make a custom response with the code 200 OK pointing to
/. This off loads the routing to your React app.
- You’ll want to go into the CloudFront distribution, click on Error Pages, and create a custom error response. You want to make a custom response with the code 200 OK pointing to
I uploaded new files to the S3 bucket to update my app, but when I go to my domain it isn’t updated!
- You want to go into CloudFront, click on Invaldations, and create a new one for
/*. You can enter specific file paths, but this will bust the cache for all of your files.
- You want to go into CloudFront, click on Invaldations, and create a new one for
Thanks for reading! For more content, or for any questions or comments, please reach out to me via Twitter